HP DeskJet, ENVY 5000 Printers - Paper Jam Error
HP DeskJet, ENVY 5000 Printers - Paper Jam Error
This document is for HP DeskJet Ink Advantage 5075, 5076, 5078, 5085,
5088 and ENVY 5010, 5012, 5014, 5020, 5030, 5032, 5034, 5052 and 5055
All-in-One printers.
During a print job, the printer stops feeding pages and a Paper
Jam error displays on the printer control panel. This indicates that
paper might be jammed inside the printer.
NOTE:Paper jams can be real or false. The printer might report a paper jam even when there is no jammed paper. The following steps apply to both real and false paper jams.
Step 1: Clear jammed paper from the printer
Paper jams can occur in multiple areas of the printer. If you cannot find
the paper jam in one area, continue to the next area until the jam is
located.
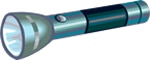
You need a flashlight to complete some of these steps.
Figure : Flashlight
Clear jammed paper from the paper tray area
Remove any jammed paper that is accessible from the input tray and
underneath the printer.
-
Touch OK to try to automatically clear the paper jam.If the paper jam error persists, continue these steps to manually clear the jam.
-
Push in the output tray, if necessary.
-
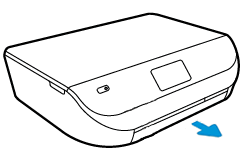
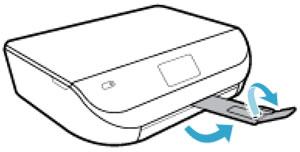
Open the input tray door, and then pull it toward you to extend the input tray.Figure : Opening the input tray
-
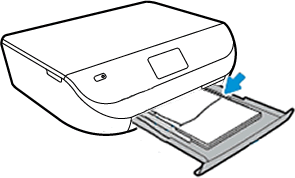
Use a flashlight to check for any paper or objects in input tray area, and then remove any paper or objects that you find. To avoid tearing any whole sheets of paper, pull the paper with both hands.Figure : Removing jammed paper from the input tray
-
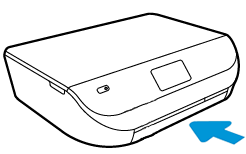
Push the input tray back into the printer.Figure : Closing the input tray
-
Turn off the printer, and then disconnect any cords connected to the printer, such as the power cord and USB cable.
-
Turn the printer on its side to access its underside (base).
CAUTION:
Before turning the printer, use your hands to secure the scanner lid. -
Open the input tray door, and then pull it toward you to extend the input tray.
-
Use a flashlight to check for any paper or objects in the cleanout area, and then remove any paper or objects you find. To avoid tearing the paper, slowly pull out the paper.If any torn pieces of paper remain inside the printer, more jams are likely to occur.Figure : Removing jammed paper from underneath the printer
-
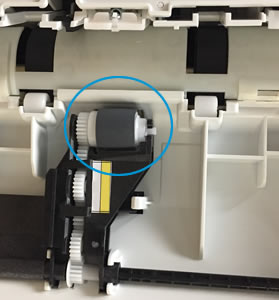
Use a flashlight to check for any torn paper in the paper pick rollers, and then remove any paper you find.Figure : Example of the paper pick roller
-
Close the input tray.
-
Return the printer to its normal position.
-
Open the ink cartridge access door, and then look inside the printer for any loose objects that might have shifted when the printer was turned over.
-
Remove any loose objects found.
-
Close the ink cartridge access door.
-
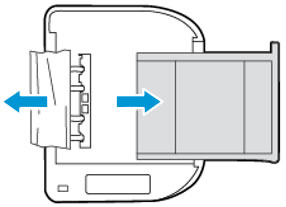
Pull out the output tray, and then lift the output tray extender.Figure : Pulling out the output tray and lifting the output tray extender
-
Reconnect the power cord and any other cables to the rear of the printer, and then turn on the printer.
Try to print. If the error persists, check for jammed paper in
another area of the printer.
Clear jammed paper from the ink cartridge access area
Remove any jammed paper from the ink cartridge access area.
-
Touch OK to try to automatically clear the paper jam.If the paper jam error persists, continue these steps to manually clear the jam.
-
Push in the output tray, if necessary.
-
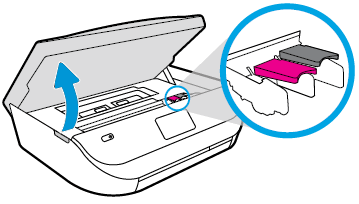
Gently grasp the handles on either side of the printer, and then raise the ink cartridge access door until it locks into place.The carriage moves slightly to the left.Figure : Opening the ink cartridge access door
-
Wait until the carriage is idle and silent before you continue.
-
With the printer turned on, disconnect the power cord from the rear of the printer.
WARNING:
You must disconnect the power cord before reaching inside the printer to avoid risk of injuries or electric shock. -
Use a flashlight to check for any paper or objects in the ink cartridge access area by moving the print carriage side to side.
-
Remove any paper or objects that you find. To avoid tearing the paper, use both hands to pull out the paper.
-
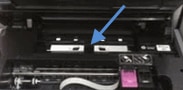
Locate the paper path cover in the area behind the ink cartridge access area.Figure : Example of the paper path cover
-
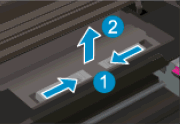
To remove the paper path cover, pinch the tabs together, and then lift up.Figure : Removing the paper path cover
-
Pinch the tabs together
-
Lift up
-
-
Use a flashlight to thoroughly check the rollers for torn pieces of paper that might remain inside the paper path. Remove any paper or objects that you find. To avoid tearing the paper, use both hands to pull out the paper.
-
Replace the paper path cover with the spring-loaded tabs facing toward the front of the printer. Gently press the cover down at the left and right edges until the cover clicks into place.
NOTE:
Make sure both edges of the paper path cover are in place.Figure : Replacing the paper path cover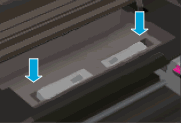
-
Close the ink cartridge access door.
-
Pull out the output tray, and then lift the output tray extender.Figure : Pulling out the output tray and lifting the output tray extender
-
Reconnect the power cord and any other cables to the rear of the printer, and then turn on the printer.
Try to print. If the error persists, check for jammed paper in
another area of the printer.
If you have checked and removed any jammed paper from each printer area
and the error persists, continue to the next step.
Step 2: Make sure the carriage moves freely
To make sure there are no foreign objects or paper in the printer, move
the carriage across the width of the printer.
-
Turn on the printer, if it is not already on.
-
Gently grasp the handles on either side of the printer, and then raise the ink cartridge access door until it locks into place.The carriage moves slightly to the left.Figure : Opening the ink cartridge access door
-
Wait until the carriage is idle and silent before you continue.
-
With the printer turned on, disconnect the power cord from the rear of the printer.
WARNING:
You must disconnect the power cord before reaching inside the printer to avoid risk of injuries or electric shock. -
Use a flashlight to check for any paper or objects that might be restricting the carriage, and then remove any paper or objects that you find.
CAUTION:
If the paper tears when you remove it from the rollers, check the rollers and wheels for torn pieces of paper that might remain inside the printer. If pieces of paper remain in the printer, more paper jams can occur. -
Reach inside the printer through the ink cartridge access door, and then manually move the carriage.
-
If the carriage is stuck on the right side of the printer, move the carriage to the left side of the printer.
-
If the carriage is stuck on the left side of the printer, move the carriage to the right side of the printer.
-
If the carriage is stuck in the middle of the printer, move the carriage to the right side of the printer.
-
-
Remove any loose paper or obstructions you find.
-
Make sure the carriage can move freely across the width of the printer. Firmly push the carriage to the left side of the printer, and then push it to the right side.
-
Close the ink cartridge access door.Figure : Closing the ink cartridge access door
-
Pull out the output tray, and then lift the output tray extender.Figure : Pulling out the output tray and lifting the output tray extender
-
Reconnect the power cord to the rear of the printer, and then turn on the printer.
Try to print. If the error persists, continue to the next step.
Step 3: Use an automated tool to clean ink smears
Cleaning ink smears can help clear paper jams and optimize print quality.
-
Load the printer with plain white paper.
-
On the printer control panel, swipe left on the display, and then touch Setup
 .
.
-
Touch Tools.
-
Swipe up on the display, and then touch Clean Page Smears.The printer slowly feeds a blank page.
-
Wait for the printer to eject the blank page.
Try to print. If the error persists, continue to the next step.
Step 4: Clean the paper feed rollers
Dust, paper fiber, and other debris might accumulate on the paper feed
rollers and cause paper jams and paper feed issues.
Clean the rollers inside the ink cartridge access area
Clean the rollers inside the ink cartridge access area.
-
Turn off the printer, and then disconnect the power cord.
WARNING:
To avoid risk of injuries or electric shock, disconnect the power cord before reaching inside the printer. -
Push in the output tray, if necessary.
-
Gently grasp the handles on either side of the printer, and then raise the ink cartridge access door until it locks into place.Figure : Opening the ink cartridge access door
-
Lightly dampen a lint-free cloth with distilled water, and then squeeze any excess liquid from the cloth.
-
Press the cloth against the rollers inside the printer, and then rotate the rollers upwards with your fingers. Apply a moderate amount of pressure to remove any dust or dirt buildup.Figure : Rollers in the ink cartridge access area

-
Allow the rollers to dry (approximately 10 or 15 minutes).
-
Locate the paper path cover in the area behind the ink cartridge access area.Figure : Example of the paper path cover
-
To remove the paper path cover, pinch the tabs together, and then lift up.Figure : Removing the paper path cover
-
Pinch the tabs together
-
Lift up
-
-
Lightly dampen a lint-free cloth with distilled water, and then squeeze any excess liquid from the cloth.
-
Press the cloth against the rollers, and then rotate them upward with your fingers. Apply a moderate amount of pressure to remove any dust or dirt buildup.Figure : Rollers behind the ink cartridges
-
Allow the rollers to dry (approximately 10 or 15 minutes).
-
Replace the paper path cover.Figure : Replacing the paper path cover
-
Close the ink cartridge access door.
-
Pull out the output tray, and then lift the output tray extender.Figure : Pulling out the output tray and lifting the output tray extender
-
Reconnect the power cord and any other cables to the rear of the printer, and then turn on the printer.
Try to print. If the error persists, clean the rollers in another
area of the printer.
Clean the rollers underneath the printer
Clean the rollers underneath the printer.
-
Turn off the printer, and then disconnect any cords connected to the printer, such as the power cord and USB cable.
-
Turn the printer on its side to access its underside (base).
CAUTION:
Before turning the printer, use your hands to secure the scanner lid. -
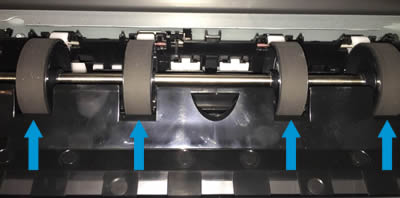
While supporting the printer with one hand, pull the paper tray open to expose the paper rollers underneath the printer.Figure : Rollers underneath the printer
-
Lightly dampen a lint-free cloth with distilled water, and then squeeze any excess liquid from the cloth.
-
Press the cloth against the rollers inside the printer, and then rotate the rollers upwards with your fingers. Apply a moderate amount of pressure to remove any dust or dirt buildup.
-
Allow the rollers to dry completely (approximately 10 minutes).
-
Close the paper tray, and then set the printer upright.
-
Reconnect the power cord and any other cables to the rear of the printer, and then turn on the printer.
Try to print. If the error persists, continue to the next step.
Step 5: Reset the printer
Sometimes a paper jam error persists even though there is no jammed paper
(false paper jam). Reset the printer, which might clear a false paper jam
error, and then try to print again.
-
With the printer turned on, disconnect the power cord from the printer.
-
Unplug the power cord from the power source.
-
Wait 60 seconds.
-
Reconnect the power cord to a wall outlet and to the printer.
NOTE:
HP recommends plugging the printer directly into a wall outlet.
Try to print. If the error persists, continue to the next step.
Step 6: Service the printer
Service or replace your HP product if the issue persists after completing
all the preceding steps.
Go to Contact HP Customer Support to schedule a product repair
or replacement. If you are in Asia Pacific, you will be directed to a
local service center in your area.
https://support.hp.com/

Comments
Post a Comment