HP DeskJet, ENVY 5000 Printers - Loading Paper, Cards, and Envelopes
HP DeskJet, ENVY 5000 Printers - Loading Paper, Cards, and Envelopes
This document is for HP DeskJet Ink Advantage 5075, 5076, 5078, 5085,
5088 and ENVY 5010, 5012, 5014, 5020, 5030, 5032, 5034, 5052 and 5055
All-in-One printers.
This document provides instructions for loading plain paper, photo paper,
cards, and envelopes into the printer.
CAUTION:To avoid printing issues, never load multiple types of paper in the input tray or attempt to load paper while the printer is printing.
Load plain paper
Load plain paper, such as A4, U.S. letter, or U.S. legal, into the input
tray.
-
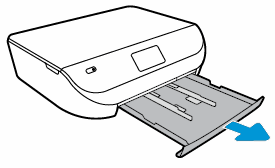
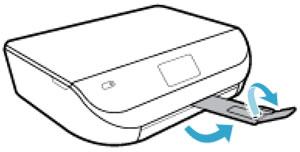
Open the input tray door, and then pull it toward you to extend the input tray.Figure : Opening the input tray
-
Slide out the paper width guides as far as possible.Figure : Adjusting the paper width guides

-
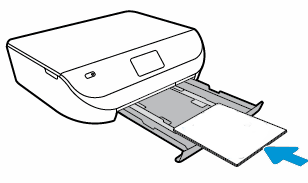
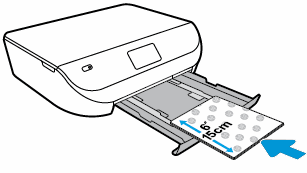
Load a stack of paper in portrait orientation with the print side facing down.Do not load more than 250 sheets at a time.Figure : Loading plain paper
-
Push the stack into the tray until it stops.
-
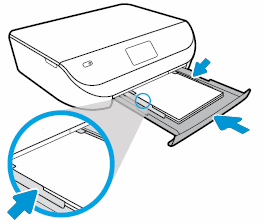
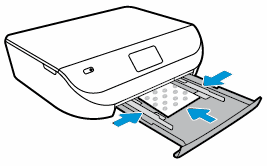
Slide in the paper width guides until they touch the edges of the stack of paper.Do not push in the guides so tightly that they bind against the paper.Figure : Sliding in the paper width guides
-
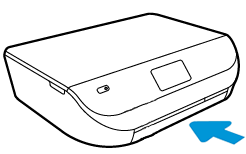
Push the input tray into the printer.
-
For U.S. letter or A4 size paper: Close the input tray door completely.Figure : Closing the tray completely
-
For legal size paper: Leave the input tray door open. A portion of the legal size paper sticks out of the printer.Figure : Leaving the input tray door open

-
-
Pull out the output tray, and then lift the output tray extender.Figure : Pulling out the output tray and lifting the output tray extender
NOTE:Before printing or copying, select the correct paper size and paper type settings from the control panel or computer.
Load envelopes
Load the printer with blank envelopes print side down to print addresses
for the recipient and the sender.
-
Open the input tray door, and then pull it toward you to extend the input tray.Figure : Opening the input tray
-
Slide out the paper width guides as far as possible.Figure : Adjusting the paper width guides
-
Load a stack of envelopes print side down in the center of the tray.Make sure to position envelopes with the flap on the short edge away from the printer, and position envelopes with the flap on the long edge with the flap to the left.Figure : Positioning the envelopes print side down

-
Make sure the stack of envelopes align with the appropriate paper size lines on the bottom of the input tray.Do not load more than 10 envelopes at a time.
-
Slide in the paper width guides until they rest against the stack of envelopes.Do not push in the guides so tightly that they bind against the envelopes.Figure : Sliding in the paper width guides

-
Push the input tray into the printer.
-
Pull out the output tray, and then lift the output tray extender.Figure : Pulling out the output tray and lifting the output tray extender
NOTE:Before printing or copying, select the correct paper size and paper type settings from the control panel or computer.
Load cards or photo paper
Load specialty sized photo paper, index cards, or postcards, like Hagaki,
print side down into the input tray before you print.
-
Open the input tray door, and then pull it toward you to extend the input tray.Figure : Opening the input tray
-
Slide out the paper width guides as far as possible.Figure : Adjusting the paper width guides
-
Load a stack of cards or photo paper print side down in portrait orientation in the center of the tray.Figure : Loading paper or card print side down
-
Make sure to align the paper or card with the appropriate paper size lines on the bottom of the input tray.Do not load more than 10 cards or photos at a time.
-
Slide in the paper guides until they rest against the stack of cards or photo paper.Do not push the guides in so tightly that they bind against the paper or cards.Figure : Sliding in the paper width guides
-
Push the input tray into the printer.
-
Pull out the output tray, and then lift the output tray extender.Figure : Pulling out the output tray and lifting the output tray extender
NOTE:Before printing or copying, select the correct paper size and paper type settings from the control panel or computer.
https://support.hp.com/

Comments
Post a Comment